

PART 7 - EVENTS SO FAR
So let's recap. In Phase 1 I detailed all the components I sourced and calculated the total cost to date. In Phase 2 I expanded on this by providing documentation to help in identifying parts, determining values, and their location on the board; then finally I explained the tragedy of how I destroyed all my hard work attempting to remove junk sockets that were the source of all the problems I was encountering.
I took a few days to get my head together about all of this. The way I figured it, I had 3 options:
- Give up, scrap everything and swallow the loss.
- Bodge a repair to the broken board.
- Start again.
In truth I only gave serious consideration to options 2 and 3. Ripped traces aren't the end of the world and with the correct application of bodge wire I could have it up and running again. But. I would have it up and running with all those junk sockets (coz there was just no way I was going to tackle de-soldering any more of them!).
However, with all the research I'd done, I had pretty much sourced suppliers for all the replacement parts I needed. Those parts which were not so easy to obtain (like the toroidal line filter at L4) I reckoned I could salvage from my broken board. Sure I would need to spend more cash on a new PCB and new components but, as I already had the case and all the ICs and accessories, which are by far the biggest expense, I figured I could restart for a semi-reasonable price.
It was a fairly easy decision in the end. I decided to scrap the broken board and start again.
There was no one supplier I could get everything from. In the end I used 5: Mouser, Digikey, Retroleum, Tindie (Bob's Bits) and RS Online.
Let's see how that worked out for me:
PART 8 - THE COST OF REBUILDING
From Digikey: DB9 controller ports, most of the capacitors, most of the diodes, fuse, fuse-clips, some of the transistors, power LED header, the L1 and L5 inductors and the 14, 18 and 20 pin sockets (Mill-Max brand, 110 series).
Cost of Components: £33.44
Additional Tax: £6.69
Shipping: Free
Total: GBP £40.13 (USD $53.78, EUR €47.98 )
From Mouser: the rest of the capacitors and diodes, the crystal oscillator, keyboard header and the rest of the Mill-Max sockets:
Cost of Components: £26.33
Additional Tax: £7.66
Shipping: £12.00
Total: GBP £45.99 (USD $61.64 , EUR €54.99 )
From Retroleum: all the remaining port connectors and a new power switch.
Cost of Components: £13.87
Additional Tax: -
Shipping: £2.35
Total: GBP £16.22 (USD $21.74, EUR €19.39 )
From Tindie (Bob's Bits): the new PCB and the resistor pack.
Cost of Components: $55.50
Additional Tax: -
Shipping: $6.00
Total: USD $61.50 (GBP £45.87, EUR €54.84)
And finally from RS Online: 5v and 12v Voltage Regulator replacements.
Cost of Components: £15.81
Additional Tax: £4.15
Shipping: £4.95
Total: GBP £24.91 (USD $33.39, EUR €29.78 )
PART 9 - A QUICK ASIDE
During this process I tried to buy leaded solder and to my astonishment, was prevented from doing so:

PART 10 - A VERY EXPENSIVE MISTAKE
Getting back to the rebuild costs, all the new components came to a grand total of (GBP, USD, EUR):
£173.12, $232.05, €206.98
and we add this to our previous grand total which was:
£549.58, $753.65, €661.25
Which gives a revised grand total of:
£722.70, $985.70, €868.23
That's the first time I've calculated all that so yeah, I'm going to need a moment to let that sink in. The Mega65 is looking pretty goddam reasonable right about now!
PART 11 - REBUILDING
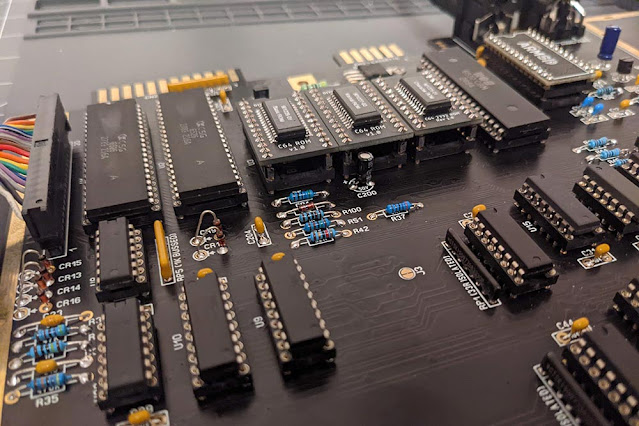
Aside from a delay due to RS Online sending the wrong component - a pain but, in fairness, something they resolved perfectly well, the rebuild was completed once again over a week, and I undertook it in exactly the same way as the first build, with only one minor change. This time I vertically mounted the diodes at CR9 and CR12-16 which looks and feels much nicer.

And the new sockets? Absolutely stunning. They were comparatively expensive but worth every penny. Every single chip is being held in a vice like grip and, surprise surprise, on switching on for the first time, everything just worked. I felt like the conquering hero. Vindicated. All my woes and stresses just fell away. There are other 250466 SixtyClones, but this one is mine.

From a purely financial point of view, this whole exercise is, to put it mildly, utterly ridiculous. Even if I exclude the additional £173.12 it cost me to rebuild, the initial costs of, lets call it a round £550, are stupid. For all that money, I have merely recreated a 1980s computer, with no additional functionality, and with all the identical problems the original computers had. From a purely financial point of view, it's laughable.
But, for me, none of this was about the money. This was a wholly technical exercise and personal ambition. I will (and do) get a tremendous amount of satisfaction knowing that this C64 only exists because my hands built it.
And on that, very satisfactory note, we can draw the curtain on Phase 3.
In Phase 4, with a fully functioning computer, we'll take a look at some chip replacements and the strange issues they present. Will the fun ever end?


