This manual is a remastered consolidation of two original Commodore documents:
- The Dead Test Diagnostic Manual (1988)
- The C64 Diagnostic Instruction & Troubleshooting Manual (1992)
PDFs are available below.
Why consolidate?
It seemed eminently sensible. When troubleshooting problems with a Commodore 64 there's a significant chance you will use both the Dead Test and the Diagnostic Cartridges (the latter, potentially with a harness) to aid in the fault finding process. They are natural bedfellows and rather than reaching for two documents, providing a single volume for reference seemed a practical thing to do.
Additionally, the original documents are not particularly lengthy and consolidating saves printing costs.
What's different in this consolidated manual?
- Created a cover which is in keeping with the style of the other documents I've remastered and thus ignored the original document designs. This is a move towards creating a matching "library". As a consequence of creating a new cover I have written a new summary "blurb" on the rear cover.
- Ignored original typeface and used fonts which are in keeping with the other documents I've remastered. This too, is a move towards creating a matching "library".
- Tried to ensure consistency throughout. So, for example in the original Dead Test manual, reference is made to [BAD] and [OK], with square brackets, whereas in the Diagnostic Manual these same references are written as 'BAD' and 'OK' with no square brackets, instead opting for single quotes. To give the document cohesion, I opted to use single quotes throughout. Changes such as that do not alter the meaning of the original in any way but simply allow this revision to run together without obvious and jarring stylistic differences.
Some sample images:
Purpose of the manual
In case it's not obvious, the purpose of this (and the originals) is to provide instructions to help diagnose problems with a Commodore 64. Any owner of a Commodore 64 should be prepared to be faced with a non-working computer, and that applies to new builds (like a SixtyClone self-build) as much as an original machine. Therefore an essential part of your armoury should be both a Dead Test and Diagnostic cartridge. These days such cartridges are available from numerous sellers and are usually "all in one", requiring a simple jumper change to be either a Dead Test or a Diagnostic cartridge. To undertake a complete diagnostic test a loopback harness is required which plugs into the keyboard connector, user port, cartridge port and joystick ports allowing signals to be tested. There are a few options when it comes to acquiring a harness and sellers can be found with a simple Google search. This manual gives instructions in how to use the Dead Test and Diagnostic software and provides further troubleshooting information to dig deeper into issues you may be experiencing.
The PDFs
Main Body Text (click image to download):
Cover (click image to download):
Printing
If you find an error, please contact me. I will make the necessary corrections and upload a revision.
I used Lulu.com to print my copy and was very happy with the results. Your mileage may vary and obviously I can't be responsible for them messing up. However, I've had a lot of books printed with them now and I've had no issues at all.
NB - different Print on Demand (POD) companies have different requirements and guidelines. I specifically designed this book to meet the guidelines outlined by Lulu. If you choose to use another POD company you may well find these PDFs do not meet their criteria.
The process is reasonably straightforward if you have a lulu account: simply follow the instructions on the site to Start a Project and select "Print Book" from amongst the options; Under "Select a Goal" select the option: "Print Your Book. Your book will be uploaded to your account and available only to you for purchasing copies in any quantity you desire." Give your project a name and then press the "Design Your Project" button then follow the illustrated instructions below:
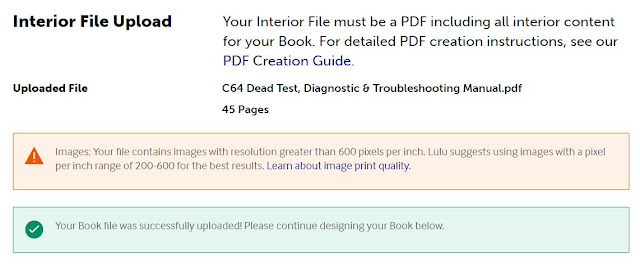
1. Upload the "Interior File", i.e. the main body text PDF. You may safely ignore any warning messages (as seen below). The final product is unaffected as you can see from the sample images above.
2. Select Book Specifications. You should not need to enter anything here: Book Size and Page Count should auto-complete based on the PDF you just uploaded.
3. Select Interior Color. Choose Black & White Standard as shown below.
4. Choose Paper Type. For best results choose 80# White - Coated. This is the durable, but most expensive option.
5. Select Book Binding. You must select "Coil Bound" as shown. The book cover provided has no spine as this has been specifically designed to be a Coil Bound book.
6. Select Cover Finish. This is a matter of taste really but I always choose "Glossy". Based on the options selected above, the Print Cost will now be shown. This will vary from country to country and DOES NOT include shipping. Periodically Lulu increase their prices too so the figure shown below is only what I paid, in my currency, at the time of printing.
7. Upload the Cover PDF provided.
8. Preview the Book. Don't ignore this part. This is your opportunity to see how the book will print and to check you are happy with it. You will notice that the page numbers appear to be in the margins of this book - don't worry about that, it's quite deliberate and they are not cut off in printing as you can see from the sample images above.
9. Download copies of the "Print-Ready" files. Again, don't ignore this part. This is another opportunity to preview the book and check for errors before you commit to buy. Once you are happy, press "Review Book".
10. Review Book. Assuming you have taken the necessary time to check and double check that you are happy with the contents and how the book will print, and you are satisfied that you can't see any errors, press "Confirm and Publish". You will then be given the opportunity to print and purchase the book. This concludes the steps required.
ERRATA
As at 27th January 2025: no errors reported.


