In days past, when I got a new camera, the first thing I used to do was have a quick flick through the user guide, familiarise myself with the everyday functions then switch it on, put it into auto mode and that was pretty much where it stayed. By keeping the camera in auto mode I let the camera decide on the difficult elements to taking my pictures. All I wanted to do was point my camera at something, zoom in or out so it looked good, focus then take the picture. This is called “point and shoot” and it works fine, to a point. The thing to remember is that as clever as modern cameras are (and they are very clever!) they often don’t make the best choice. I would look at my pictures afterwards and kick myself because if I was being really, really honest, there were an awful lot which had something wrong and which I could have done something about if only I got to know how my camera worked a bit better. That’s when I bit the bullet, put my camera into manual mode and made a decision that I would learn how to do things better. I won’t pretend it’s not difficult. It is. And frustrating. And just when you think you understand something, there’s another complication just around the corner. That said, if you’ve got this far in reading this article then I guess you must have more than a passing interest in improving your photography and I think it’s worth my while explaining a couple of the other technicalities to help you get the best out of your camera. I’ll keep things as simple as I possibly can.
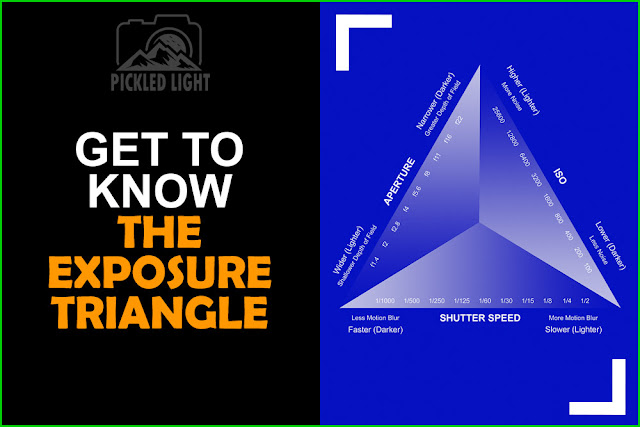
In the last article I went through focal length and zoom. These dictate how close you can get to your subject. Once you’ve done that, there are three other things to consider before you take your picture. This is called “The Exposure Triangle” and it involves the Shutter Speed; the Aperture; and the ISO.
 |
| The Exposure Triangle |
In auto mode, your camera decides on these 3 settings and you don’t have to worry about them. All of these elements determine how dark or bright your image will be. They can also affect the style of your photograph and for that reason it’s very important to know what’s going on so that you can decide what style of picture you want. Let’s take these in turn.
Shutter Speed
After you’ve focused your camera, you press the button to take your picture and two things will happen in very quick succession: firstly, the reflex mirror will swing up, then the camera shutter opens then closes, exposing the camera’s sensor to the light. This animation shows the whole process in slow motion:
You can tell the camera how quickly to open and close the shutter and this is called shutter speed. If you're taking a picture of a bird flying you probably want to use a very fast shutter speed to make sure the final image isn’t blurry from either your movement or the bird's motion. In that example you would want to use a shutter speed of about 1/2000th of a second. That means the curtains of the shutter will open and close in 1/2000th of a second. So fast in fact, that it doesn’t let much light into the camera and for that reason you will need to adjust both of the other settings in the exposure triangle to make sure your image is nice and bright. If you're taking a picture of a bird sitting on a branch, you will normally be able to use a much slower shutter speed, say 1/250th of a second, maybe 1/160th of a second. This leaves the shutter open longer and lets more light into the camera so again you will need to adjust either the ISO or the Aperture to compensate to make sure the image isn’t too bright. In landscape photography, you may have pictures with a shutter speed of several seconds and so, once again, you must adjust the other settings to compensate.
Aperture
The aperture in your camera lens is formed from blades of plastic. As you adjust the aperture, these blades pull apart or slide back together again. When they pull apart they create a hole and this hole is called the aperture. The light shines through this hole as long as the shutter is open and shines onto the sensor. Adjusting the aperture means that you are adjusting how big this hole will be. The bigger the hole, the more light gets into the camera. The smaller the hole the less light gets into the camera.
 |
| Examples of Aperture. Left to Right: f/22, f/11, f/4 |
Aperture is measured in f-stops and confusingly a smaller f-stop number, like f/4, means a larger aperture whereas something like f/22 is a smaller aperture.
Adjusting the aperture also has another, very profound effect and that is depth of field. Depth of field is the amount of your picture that is in focus and this also determines how out-of-focus your background is. Now I am not going to get into the physics of how it works and I don’t intend to get really complicated here but in very simple terms: if you have a very small aperture, less light will get into the camera and you will have a very large depth of field – that means almost everything will be in focus, from objects near the camera to objects in the distance. This is very useful for landscape pictures where you may want everything to be in focus. If you have a very large aperture, more light will get into the camera and you will have a very shallow depth of field – that means that the objects in the background will be blurry and out of focus. This is very useful for taking nice portraits and for nature photography where you don’t want the background to distract from the main object of the photograph. Just remember, the bigger the f number; the smaller the hole; the sharper the background. The following examples demonstrate this effect in practise:
 |
| Taken at f/22 |
 |
| Taken at f/16 |
 |
| Taken at f/11 |
 |
| Taken at f/8 |
 |
| Taken at f/4 |
ISO
And finally there is the ISO. This is an old term that comes from the days of film photography and was used to describe how sensitive a film was to light. A film with a low ISO (e.g. 50) was not very sensitive to light and you would have to have a longer shutter speed or larger aperture (or both) to compensate. A film with a high ISO was much more sensitive to light and so could be used with a faster shutter and smaller aperture. Of course, digital cameras don’t use film, it's the sensor on the camera which gathers the light and camera manufacturers will have you believe that ISO in a digital camera adjusts the sensitivity of the sensor to the light in the same way. This is not true.
In a digital camera ISO is actually signal gain. It is applied after the image has been captured to amplify the signal, so technically it has nothing to do with exposure at all but we treat it as though it does because the effect is broadly similar. It does not add more light to your image. Only aperture and shutter speed can do that.
What you need to remember is that the higher the ISO value, the more the image, and the existing noise in that image, are amplified. Noise is something you want to minimise so a good rule of thumb is to use the lowest ISO you can get away with. I tend to keep my ISO at 100 (the lowest my camera allows) and once I’ve got the shutter speed and aperture I want, if the image is still too dark, only then do I increase the ISO. Of course, one thing I’ve learned about photography is that every rule is meant to be broken and just because this is what I do, it doesn’t make it right for you. This is exactly the sort of thing you should experiment with to see what you like best. Having some noise in your pictures can give a grainy, moody look and this might be exactly what you want to achieve. The following images (cropped to 100%) show how image quality is affected by ISO, please bear in mind this is how my camera deals with ISO, yours will be different.:
 |
| Taken at ISO 100 |
 |
| Taken at ISO 200 |
 |
| Taken at ISO 400 |
 |
| Taken at ISO 800 |
 |
| Taken at ISO 3200 |
 |
| Taken at ISO 6400 |
 |
| Taken at ISO 12800 |
Test images like these tell me that my Camera is fine at ISO 100 to 800 in good light. I can use 1600 at a push but anything above that is a mess with too much lost detail. I would recommend you do similar tests.
The point is that depending on the circumstances, and the type of picture you want to achieve, knowing how the exposure triangle affects your pictures can make the difference between taking a good picture and taking a great one. Perhaps, the next time you get your camera out you should stop for a moment and think about the image that you want to achieve? Do you want a blurry background? If you do then having a wide aperture is going to dictate what you do with the shutter speed and ISO. Am I taking a picture of something moving quickly? In that case, you have to use a fast shutter speed which will mean you have to adjust the aperture and ISO accordingly. Do you want a sharp, clean landscape? That means using a very small aperture and a very low ISO which means you’ll need a very long shutter speed – perhaps half a second or more in which case you’ll need a tripod to hold your camera steady. You can do all of this by using the Manual mode of your camera. All DSLRs will allow you to use manual mode, a lot of bridge cameras will too but some won’t so this is something to watch for if you’re interested in experimenting.
Also, and this is really important, an awful lot depends on the available light. On a nice bright sunny day there is going to be a lot more light around than on a dark cloudy winters day (here in Scotland it’s sometimes hard to tell the difference!) but this will have a noticeable effect on your exposure triangle settings.
Most digital camera can make this a bit easier for you by having settings called “Aperture Priority” and “Shutter Priority” (please be aware that different manufacturers call these settings different things but your camera manual will help you here) and selecting either of these will allow you to choose either the Aperture value or the shutter speed then the camera will decide everything else – it’s a half-way house to going fully manual and if you’re not comfortable with manual mode perhaps you could experiment with these? Nothing beats practise and experimentation to improve.


